When you are running stateful microservices on your AKS cluster and you are looking for a persistent storage options beside native Azure PaaS services like Cosmos DB, Azure SQL Database, Azure Database for MySQL or Azure Database for PostgreSQL, then you have two options. Per default Kubernetes supports Azure Disk and Azure File as storage classes natively.
-> https://kubernetes.io/docs/concepts/storage/storage-classes/#azure-disk
-> https://kubernetes.io/docs/concepts/storage/storage-classes/#azure-file
Both storage options are having pros and cons. Let us have a look at it. Azure Files provides fast mount and scalability but suffers in the performance part. Azure Disks provides performance but is lacking in fast mount and scalability. Depending on the selected VM size for your AKS agent nodes you have certain restrictions regarding performance and scalability for Azure Disks. I will provide an example later, when talking about dysk as persistent storage option.
| Azure Disks | Azure Files | |
| + Performance – Scalability – Mount time |
+ Scalability + Mount time – Performance |
|
| Performance | Up to 7500 IOPS* Up to 250 MBps throughput* * Disk size P40/P50 and depends on VM size |
1000 IOPS*/** 60 MBps throughput*/** * Per file share |
| Scalability | 1-64 data disks per VM depending on VM size | No file share limit |
| Mount time | Approximately 30-60 seconds | Approximately 1 second or less |
| Capacity | Up to 4 TB per disk | Up to 5 TB per file share** |
** Overall Azure Storage account limit applies
-> https://docs.microsoft.com/en-us/azure/storage/files/storage-files-scale-targets
-> https://azure.microsoft.com/en-us/blog/announcing-larger-higher-scale-storage-accounts/
So, now let us have a look at the mount time, because this is the reason why you would be considering using dysk instead of Azure Disks.
The mount or attach process of an Azure Disk to a VM takes approximately 30-60 seconds per disk from what I have observed during my tests and projects with Microsoft Azure. The process runs not in parallel. That said attaching four disks to a VM can take between 2-4 minutes which is not fast when running container workloads. Detach also consumes between 30-60 seconds as operation. Azure Files is here a much faster option looking at the mount times.
Here comes dysk into play. One of the Microsoft engineers in Redmond has started dysk as a GitHub project to target the mount time issue.
-> https://github.com/khenidak/dysk
dysk leverages the Linux kernel and Azure Storage page blobs to bring down the mount time to 1 second or less.
Azure Disks:
------------
Events:
  Type    Reason                  Age   From                               Message
  ----    ------                  ----  ----                               -------
  Normal  Scheduled               1m    default-scheduler                  Successfully assigned default/mssql-75dc84f78-98hkd to aks-agentpool-14987876-3
  Normal  SuccessfulAttachVolume  39s   attachdetach-controller            AttachVolume.Attach succeeded for volume "pvc-308490aa-a209-11e8-b937-0a58ac1f0c1f"
  Normal  Pulling                 2s    kubelet, aks-agentpool-14987876-3  pulling image "microsoft/mssql-server-linux:latest"
  Normal  Pulled                  0s    kubelet, aks-agentpool-14987876-3  Successfully pulled image "microsoft/mssql-server-linux:latest"
  Normal  Created                 0s    kubelet, aks-agentpool-14987876-3  Created container
  Normal  Started                 0s    kubelet, aks-agentpool-14987876-3  Started container
dysk:
-----
Events:
  Type    Reason                  Age   From                               Message
  ----    ------                  ----  ----                               -------
  Normal  SuccessfulAttachVolume  17s   attachdetach-controller            AttachVolume.Attach succeeded for volume "kubernetes-dynamic-pv-52a38b0fa20a11e8"
  Normal  Scheduled               16s   default-scheduler                  Successfully assigned default/mssql-75dc84f78-nsfd6 to aks-agentpool-14987876-3
  Normal  Pulling                 5s    kubelet, aks-agentpool-14987876-3  pulling image "microsoft/mssql-server-linux:latest"
  Normal  Pulled                  4s    kubelet, aks-agentpool-14987876-3  Successfully pulled image "microsoft/mssql-server-linux:latest"
  Normal  Created                 4s    kubelet, aks-agentpool-14987876-3  Created container
  Normal  Started                 4s    kubelet, aks-agentpool-14987876-3  Started container
The disks are mounted as Linux block devices directly. Using this approach dysk is independent from the VM size limitations of maximum attachable data disks to a VM and even from the IOPS/throughput restrictions.
Now, we are coming back to the example of scalability and performance of Azure Disks. Looking at a Standard_B2ms with 2 vCPUs and 8GB memory we can attach a maximum of 4 data disks to the AKS agent node. All disks together can only provide 1920 IOPS and 22.5 MBps throughput, because the VM size has these performance restrictions. Even you have selected an Azure Disk size that provide higher performance values. Another point here is the maximum of 4 data disks attachable to the Standard_B2ms VM size. That means you can only run four containers with Azure Disks as persistent storage option, because you cannot attach more than 4 data disks to the VM.
dysk attaches the disks directly to Linux as block devices. This approach does not allow to use Azure Managed Disks, only Azure Storage page blobs or better known as Azure Unmanaged Disks.
Next stop a performance test from inside a container running on one of the AKS agent nodes to show you that dysk is not restricted in IOPS or throughput by the VM size.
| IOPS | Throughput in MBps | |
| P20 disk size default limits | 2300 | 125 |
| Azure Disk (P20)* | 1954 | 21.44 |
| dysk (P20)** | 2356 | 117 |
* VM size restrictions for IOPS and throughput are applied
** Overall Azure Storage account limit applies
-> https://docs.microsoft.com/en-us/azure/storage/files/storage-files-scale-targets
-> https://azure.microsoft.com/en-us/blog/announcing-larger-higher-scale-storage-accounts/
The tests were run with FIO, if you like to run your own tests.
-> https://docs.microsoft.com/en-us/azure/virtual-machines/linux/premium-storage-performance#fio
After setting the background about the persistent storage options, we will now be starting to set up dysk.
First you must create an Azure Storage account. I recommend using ZRS (Zone Redundant Storage) instead of LRS (Local Redundant Storage) as replication option from a reliability perspective.
-> https://docs.microsoft.com/en-us/azure/storage/common/storage-redundancy-lrs
-> https://docs.microsoft.com/en-us/azure/storage/common/storage-redundancy-zrs
But this counts only for Azure Storage accounts hosting Standard Unmanaged Disks. Storage accounts hosting Premium Unmanaged Disks only supporting LRS currently.
The storage account can be created in a separated resource group outside of the resource groups that AKS uses and creates but should reside in the same Azure region.
Because dysk leverages the Linux kernel for the block device mounts and the kernel does not support TLS, the only way to provide a secure communication channel between the AKS agent nodes and the Azure Storage account is using VNET Service Endpoints.
-> https://docs.microsoft.com/en-us/azure/virtual-network/virtual-network-service-endpoints-overview
This ensures that the storage account is not accessible anymore from the public Internet and that the traffic from the AKS agent nodes to the storage account never leaves the Azure backbone.
So, make sure that “secure transfer required” is set to disabled and the VNET Service Endpoint is enabled. The first point is a necessary requirement otherwise dysk will not work and the second one is optional but should be done to ensure a secure communication channel.
In the next step we must create a Kubernetes secret containing the storage account name and access key.
kubectl create secret generic dyskcreds --from-literal accountname={STORAGE ACCOUNT NAME} --from-literal accountkey="{STORAGE ACCOUNT KEY}" --type="azure/dysk"
Afterwards the dysk storage class can be created.
apiVersion: storage.k8s.io/v1beta1
kind: StorageClass
metadata:
  name: csi-dysk
provisioner: csi-dysk
parameters:
  csiProvisionerSecretName: dyskcreds
  csiProvisionerSecretNamespace: default
dysk can be provisioned and used in two different ways. As a flex volume driver supporting Kubernetes 1.7 and upwards or as CSI supporting Kubernetes 1.10 and upwards. We will use the CSI variant.
-> https://github.com/khenidak/dysk/tree/master/kubernetes/csi
First, we need to provision the flex volume driver as stated in the GitHub repo.
kubectl create -f https://raw.githubusercontent.com/khenidak/dysk/master/kubernetes/flexvolume/deployment/dysk-flexvol-installer.yaml
We should then check that the containers are up and running, before we continue.
 > kubectl get pods -n dysk --selector dyskComponent=dysk-kubernetes-installer
NAME                           READY     STATUS    RESTARTS   AGE
dysk-flexvol-installer-mjzvn   2/2       Running   2          6h
dysk-flexvol-installer-nm44b   2/2       Running   2          6h
dysk-flexvol-installer-rlgqs   2/2       Running   2          6h
Next, we provision the dysk CSI components.
kubectl create -f https://raw.githubusercontent.com/khenidak/dysk/master/kubernetes/csi/deployment/csi-dysk-driver.yaml
 > kubectl get pods -n dysk
NAME                           READY     STATUS    RESTARTS   AGE
csi-dysk-attacher-0            1/1       Running   0          5h
csi-dysk-bzwfz                 2/2       Running   2          6h
csi-dysk-mw2n5                 2/2       Running   2          6h
csi-dysk-provisioner-0         1/1       Running   0          6h
csi-dysk-tbqrs                 2/2       Running   2          6h
dysk-flexvol-installer-mjzvn   2/2       Running   2          6h
dysk-flexvol-installer-nm44b   2/2       Running   2          6h
dysk-flexvol-installer-rlgqs   2/2       Running   2          6h
Finally, dysk is running and we can provision our first workload using it. As an example, we deploy a Microsoft SQL Server container using the dynamic provisioning of the persistent volume.
apiVersion: v1
kind: PersistentVolumeClaim
metadata:
  name: mssql-data
spec:
  accessModes:
    - ReadWriteOnce
  resources:
    requests:
      storage: 32Gi
  storageClassName: csi-dysk
Before we kick off the Microsoft SQL Server deployment, we must create the SA password as Kubernetes secret.
kubectl create secret generic mssql --from-literal=SA_PASSWORD="{SA PASSWORD}"
apiVersion: apps/v1
kind: Deployment
metadata:
  name: mssql
spec:
  replicas: 1
  strategy:
    rollingUpdate:
      maxSurge: 1
      maxUnavailable: 1
  minReadySeconds: 5
  selector:
    matchLabels:
      app: mssql
  template:
    metadata:
      labels:
        app: mssql
    spec:
      terminationGracePeriodSeconds: 10
      containers:
      - name: mssql
        image: microsoft/mssql-server-linux:latest
        ports:
        - containerPort: 1433
        env:
        - name: MSSQL_PID
          value: "Developer"
        - name: ACCEPT_EULA
          value: "Y"
        - name: SA_PASSWORD
          valueFrom:
            secretKeyRef:
              name: mssql
              key: SA_PASSWORD
        volumeMounts:
        - name: mssqldb
          mountPath: /var/opt/mssql
      volumes:
      - name: mssqldb
        persistentVolumeClaim:
          claimName: mssql-data
---
apiVersion: v1
kind: Service
metadata:
  name: mssql
spec:
  selector:
    app: mssql
  ports:
    - protocol: TCP
      port: 1433
      targetPort: 1433
  type: LoadBalancer
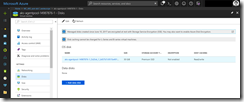
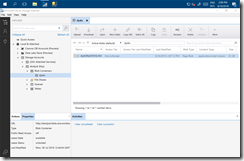
As you can see in the screenshots below, when using dysk there is no data disk attached to the Azure VM and handled by the underlying Azure platform. All operations are done from insight the VM itself.
I hope you got an idea, how beneficial the usage of dysk in your Azure Kubernetes Service cluster as persistent storage option can be. The project status of dysk is currently beta. So, test dysk before you are using it for production.

