Currently you have two options on Azure Kubernetes Service to run the cluster autoscaler.
The first one is the integrated solution on the managed master control plane side. This one is in preview and only available when using the AKS VMSS preview.
You can configure AKS during the creation process to use the cluster autoscaler or enable the CA afterwards, when it is an AKS VMSS-based cluster.
Use the following Azure CLI commands to create a new AKS VMSS-based cluster with the CA enabled. If you have not registered the VMSSPreview feature yet, then do it first before you continue.
az feature register --name VMSSPreview --namespace Microsoft.ContainerService
az feature list -o table --query "[?contains(name, 'Microsoft.ContainerService/VMSSPreview')].{Name:name,State:properties.state}"
az provider register --namespace Microsoft.ContainerService
az extension add --name aks-preview

az aks create \
  --resource-group aksVmss \
  --name aksVmssCluster \
  --kubernetes-version 1.12.6 \
  --node-count 3 \
  --enable-vmss \
  --enable-cluster-autoscaler \
  --min-count 3 \
  --max-count 6
When already running AKS with VMSS you enable the cluster autoscaler with the following Azure CLI command.
az aks update \
  --resource-group aksVmss \
  --name aksVmssCluster \
  --enable-cluster-autoscaler \
  --min-count 3 \
  --max-count 6
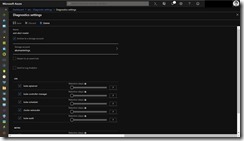
As the CA runs on the managed master control plane side you must do some additional configuration steps to get the CA log output. Just follow the Azure docs guide for getting the master logs and check mark cluster-autoscaler.
-> https://docs.microsoft.com/en-us/azure/aks/view-master-logs
For providing information about the runtime state the CA creates a Kubernetes configMap object to report the actual state of the CA and the AKS cluster. You can query the status with the following kubectl command.
kubectl -n kube-system describe configmap cluster-autoscaler-status
Name:         cluster-autoscaler-status
Namespace:    kube-system
Labels:       <none>
Annotations:  cluster-autoscaler.kubernetes.io/last-updated: 2019-03-13 13:55:56.953402677 +0000 UTC

Data
====
status:
----
Cluster-autoscaler status at 2019-03-13 13:55:56.953402677 +0000 UTC:
Cluster-wide:
  Health:      Healthy (ready=4 unready=0 notStarted=0 longNotStarted=0 registered=4 longUnregistered=0)
               LastProbeTime:      2019-03-13 13:55:56.860479724 +0000 UTC m=+23365.154091042
               LastTransitionTime: 2019-03-13 07:26:49.003127759 +0000 UTC m=+17.296738977
  ScaleUp:     NoActivity (ready=4 registered=4)
               LastProbeTime:      2019-03-13 13:55:56.860479724 +0000 UTC m=+23365.154091042
               LastTransitionTime: 2019-03-13 07:26:49.003127759 +0000 UTC m=+17.296738977
  ScaleDown:   NoCandidates (candidates=0)
               LastProbeTime:      2019-03-13 13:55:56.860479724 +0000 UTC m=+23365.154091042
               LastTransitionTime: 2019-03-13 08:43:14.035942018 +0000 UTC m=+4602.329553236

NodeGroups:
  Name:        aks-nodepool1-33037761-vmss
  Health:      Healthy (ready=2 unready=0 notStarted=0 longNotStarted=0 registered=2 longUnregistered=0 cloudProviderTarget=2 (minSize=2, maxSize=4))
               LastProbeTime:      2019-03-13 13:55:56.860479724 +0000 UTC m=+23365.154091042
               LastTransitionTime: 2019-03-13 07:26:49.003127759 +0000 UTC m=+17.296738977
  ScaleUp:     NoActivity (ready=2 cloudProviderTarget=2)
               LastProbeTime:      2019-03-13 13:55:56.860479724 +0000 UTC m=+23365.154091042
               LastTransitionTime: 2019-03-13 07:26:49.003127759 +0000 UTC m=+17.296738977
  ScaleDown:   NoCandidates (candidates=0)
               LastProbeTime:      2019-03-13 13:55:56.860479724 +0000 UTC m=+23365.154091042
               LastTransitionTime: 2019-03-13 08:43:14.035942018 +0000 UTC m=+4602.329553236


Events:  <none>
That is pretty much all you need to know about the integrated CA solution.
For AKS clusters using the standard configuration with availability sets, you are responsible for deploying, configuring and operating the cluster autoscaler. The CA itself runs then on one of the agent nodes in the kube-system namespace.
Getting things started we need to provide the necessary CA secret before we can deploy the cluster autoscaler onto our AKS cluster.
-> https://github.com/neumanndaniel/kubernetes/blob/master/cluster-autoscaler/ca-secret.yaml
apiVersion: v1
kind: Secret
metadata:
  name: cluster-autoscaler-azure
  namespace: kube-system
data:
  ClientID: <REDACTED>
  ClientSecret: <REDACTED>
  ResourceGroup: <REDACTED>
  SubscriptionID: <REDACTED>
  TenantID: <REDACTED>
  VMType: YWtz
  ClusterName: <REDACTED>
  NodeResourceGroup: <REDACTED>
You can use this script to generate the ca-secret.yaml file filled out with all the necessary configuration information.
-> https://github.com/neumanndaniel/kubernetes/blob/master/cluster-autoscaler/ca-generate-secret.sh
#! /bin/bash
ID=$(az account show --query id)
SUBSCRIPTION_ID=$(echo -n $ID | tr -d '"')

TENANT=$(az account show --query tenantId)
TENANT_ID=$(echo -n $TENANT | tr -d '"' | base64 --wrap=0)

read -p "What is your AKS cluster name? " AKS_CLUSTER_NAME
read -p "What is the AKS cluster resource group name? " AKS_RESOURCE_GROUP

CLUSTER_NAME=$(echo -n $AKS_CLUSTER_NAME | base64 --wrap=0)
RESOURCE_GROUP=$(echo -n $AKS_RESOURCE_GROUP | base64 --wrap=0)

PERMISSIONS=$(az ad sp create-for-rbac --role="Contributor" --scopes="/subscriptions/$SUBSCRIPTION_ID")
CLIENT_ID=$(echo $PERMISSIONS | jq .appId | tr -d '"','\n' | base64 --wrap=0)
CLIENT_SECRET=$(echo $PERMISSIONS | jq .password | tr -d '"','\n' | base64 --wrap=0)

SUBSCRIPTION_ID=$(echo -n $ID | tr -d '"' | base64 --wrap=0)

NODE_RESOURCE_GROUP=$(az aks show --name $AKS_CLUSTER_NAME  --resource-group $AKS_RESOURCE_GROUP -o tsv --query 'nodeResourceGroup' | tr -d '\n'  | base64 --wrap=0)

echo "---
apiVersion: v1
kind: Secret
metadata:
    name: cluster-autoscaler-azure
    namespace: kube-system
data:
    ClientID: $CLIENT_ID
    ClientSecret: $CLIENT_SECRET
    ResourceGroup: $RESOURCE_GROUP
    SubscriptionID: $SUBSCRIPTION_ID
    TenantID: $TENANT_ID
    VMType: YWtz
    ClusterName: $CLUSTER_NAME
    NodeResourceGroup: $NODE_RESOURCE_GROUP
---"
Run kubectl apply -f ca-secret.yaml next.
Before we continue with the CA deployment, we need some adjustments in the ca-deployment.yaml file.
-> https://github.com/neumanndaniel/kubernetes/blob/master/cluster-autoscaler/ca-deployment.yaml
Have a look at line 129 and 145. In line 129 we must adjust the cluster autoscaler container image tag to match the required version of the cluster autoscaler for our Kubernetes version we are using in our AKS cluster.
-> https://github.com/kubernetes/autoscaler/tree/master/cluster-autoscaler#releases
...
      - image: k8s.gcr.io/cluster-autoscaler:v1.12.3
...
In line 145 we may have to adjust the agent pool name to match the one of our AKS cluster and the CA range for min and max nodes.
...
        - --nodes=3:6:agentpool
...
You can run the following commands to get the agent pool name.
read -p "What is your AKS cluster name? " AKS_CLUSTER_NAME
read -p "What is the AKS cluster resource group name? " AKS_RESOURCE_GROUP
az aks show --name $AKS_CLUSTER_NAME  --resource-group $AKS_RESOURCE_GROUP -o tsv --query 'agentPoolProfiles[].name'
Afterwards run kubectl apply -f ca-deployment.yaml to deploy the cluster autoscaler.
As already mentioned before the CA creates a Kubernetes configMap object to report the actual state of the CA and the AKS cluster.
kubectl -n kube-system describe configmap cluster-autoscaler-status
Name:         cluster-autoscaler-status
Namespace:    kube-system
Labels:       <none>
Annotations:  cluster-autoscaler.kubernetes.io/last-updated: 2019-03-13 14:00:32.590378775 +0000 UTC

Data
====
status:
----
Cluster-autoscaler status at 2019-03-13 14:00:32.590378775 +0000 UTC:
Cluster-wide:
  Health:      Healthy (ready=4 unready=0 notStarted=0 longNotStarted=0 registered=4 longUnregistered=0)
               LastProbeTime:      2019-03-13 14:00:32.314378889 +0000 UTC m=+817.700367649
               LastTransitionTime: 2019-03-13 13:47:27.684689934 +0000 UTC m=+33.070678694
  ScaleUp:     NoActivity (ready=4 registered=4)
               LastProbeTime:      2019-03-13 14:00:32.314378889 +0000 UTC m=+817.700367649
               LastTransitionTime: 2019-03-13 13:47:27.684689934 +0000 UTC m=+33.070678694
  ScaleDown:   NoCandidates (candidates=0)
               LastProbeTime:      2019-03-13 14:00:32.314378889 +0000 UTC m=+817.700367649
               LastTransitionTime: 2019-03-13 13:47:27.684689934 +0000 UTC m=+33.070678694

NodeGroups:
  Name:        agentpool
  Health:      Healthy (ready=3 unready=0 notStarted=0 longNotStarted=0 registered=3 longUnregistered=0 cloudProviderTarget=3 (minSize=3, maxSize=6))
               LastProbeTime:      2019-03-13 14:00:32.314378889 +0000 UTC m=+817.700367649
               LastTransitionTime: 2019-03-13 13:47:27.684689934 +0000 UTC m=+33.070678694
  ScaleUp:     NoActivity (ready=3 cloudProviderTarget=3)
               LastProbeTime:      2019-03-13 14:00:32.314378889 +0000 UTC m=+817.700367649
               LastTransitionTime: 2019-03-13 13:47:27.684689934 +0000 UTC m=+33.070678694
  ScaleDown:   NoCandidates (candidates=0)
               LastProbeTime:      2019-03-13 14:00:32.314378889 +0000 UTC m=+817.700367649
               LastTransitionTime: 2019-03-13 13:47:27.684689934 +0000 UTC m=+33.070678694


Events:  <none>


